
TLS Everywhere! (Home edition)
For the past ten years, there’s been a drive to make web traffic encrypted in transit. Partly fueled by Let’s Encrypt, TLS is now supported by most public websites. In fact, w3techs.com reports that 82% of all tracked websites now serve HTTPS by default.¹
In this article, I’ll review the steps I took to implement TLS encryption for my LAN traffic. It is one of the last frontiers not yet covered by HTTPS.
Attack surface
So why is HTTPS important in a LAN? Well… it mostly isn’t. For a home network like mine, there’s no real reason to implement HTTPS except to challenge oneself and possibly bragging rights. Does this give you bragging rights? I have no idea 🤷; try it out at the next party you’re at and post the result.

Background and constraints
As all traffic is within my own LAN, I can dictate the security level, so I set out to use TLSv1.3 only whenever possible.
Depending on which devices you need to deal with, you may need to adjust the accepted TLS versions and ciphers.
I also set out to encrypt the traffic chain as much as possible. If the end service supports TLS, I’ll enable TLS. If not, I’ll settle for a proxy on the same machine.
My LAN is constantly evolving into a more complex web of interconnections but heavily simplified; the relevant areas look like this:
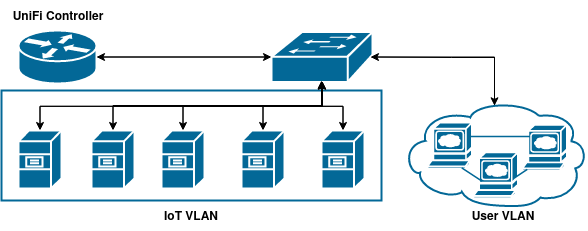
Each service (box) can be a physical server, virtual machine, or docker container, but the procedures are the same regardless.
All clients are on the User VLAN, and the UniFi Controller controls traffic between the two VLANS.
Let’s Encrypt and DNS
The vanilla behavior of most ACME-compatible scripts is to verify domain ownership by serving a token via HTTP on the domain in question. Since Let’s Encrypt can’t reach a website inside your LAN, ownership needs to be verified through DNS.
Several open-source tools do this; the most common way is through dehydrated hooks.
Check their wiki for a tool that matches your DNS provider, and if you’re using Cloudflare, I’d like to shamelessly plug my own Dehydrated CF Docker Image.

IoT
What is the LAN but not a way for your fridge to communicate with your NAS?
Since most IoT setups are designed for the IoT device to initiate communication, only the central control unit needs a TLS certificate. The devices then simply initiate an HTTPS connection with the control unit.
Homebridge
As someone bound by the shackles of the Apple ecosystem, I chose Homebridge as the control unit. Homebridge is like Home Assistant Lite and is intended to integrate with HomeKit on an Apple Homepod or AppleTV.
HomeBridge features Homebridge UI as the default web dashboard. Homebridge UI doesn’t support TLS encryption in itself, so I ended up putting an Nginx proxy in front of the dashboard. This means that the traffic is TLS encrypted all the way from the client to the proxy, but from the proxy to the dashboard, it’s unencrypted. As I keep both services on the same computer, I find this solution to be good enough.

MQTT
As an MQTT broker, I chose Mosquitto and Cedalo Management Center, both running as Docker containers.
The MQTT protocol supports TLS through MQTTS, but some low-powered MQTT clients may not be able to handle TLS encryption in which case you’ll need to have both port 8883 (MQTTS) and 1883 (MQTT) open.
docker-compose.yml:
version: "3.6"
services:
  mosquitto:
    image: eclipse-mosquitto:2-openssl
    ports:
      #- 1883:1883 #MQTT
      - 8883:8883 #MQTTS
    volumes:
      - ./config:/mosquitto/config
      - ./data:/mosquitto/data
      - ./log:/mosquitto/log
    restart: unless-stopped
  management-center:
    image: cedalo/management-center:2.2.3
    ports:
      - 8088:8088
    depends_on:
      - mosquitto
    restart: unless-stopped
    environment:
      CEDALO_MC_BROKER_ID: mosquitto-2.0
      CEDALO_MC_BROKER_NAME: Mosquitto 2.0
      CEDALO_MC_BROKER_URL: mqtts://<mqtt domain>:8883
      CEDALO_MC_BROKER_USERNAME: <service username>
      CEDALO_MC_BROKER_PASSWORD: <service password>
      CEDALO_MC_USERNAME: <admin username>
      CEDALO_MC_PASSWORD: <admin password>
      CEDALO_STREAMSHEETS_ID: streamsheets-local
      CEDALO_STREAMSHEETS_NAME: Streamsheets
      CEDALO_STREAMSHEETS_DESCRIPTION: Local Streamsheets
      CEDALO_STREAMSHEETS_URL: http://localhost:8081
I then proxy the management page on port 8088 to Nginx to get TLS encryption for the management portal.
For MQTTS via Mosquitto:
- Get an x509 certificate for the domain name you intend to use for MQTT.
- Copy the
fullchain.pemandprivkey.pemto the data directory of the Mosquitto container.
This should subsequently be done through an automated script upon certificate renewal. - Open
config/mosquitto.confand add the following:#listen 1883 listener 8883 certfile /mosquitto/data/cert.pem keyfile /mosquitto/data/key.pem tls_version tlsv1.3
NTP
Network Time Protocol, the backbone of RFC-6238.
Of course, I needed an NTP server on my home network. But what if my fridge or dishwasher spoofs the NTP traffic?!
NTS to the rescue! NTS is a new extension to NTP that implements message authentication through TLS.
Currently, chrony and ntpsec support NTS. I chose NTPSec for both the server and clients.
The setup is really simple.
On the server:
- Install ntpsec through a package manager and place your x509 certificate on the server.
- Open
/etc/ntp.conf(or sometimes/etc/ntpsec/ntp.conf) and add the following lines:nts cert <certificate path> nts key <certificate key path> nts mintls TLS1.3 nts enableThe server now accepts NTS traffic through TLSv1.3.
- To broadcast an exact time, you either want to connect to other NTS servers or install your own GPS receiver on the server.
See the Arch wiki on more info on that.
On the client:
- Install ntpsec through a package manager.
- Open
/etc/ntp.conf(or sometimes/etc/ntpsec/ntp.conf) and add the following line:server <nts server address> nts - Restart the ntpsec service:
service ntpsec restart
UniFi
The Ubiquiti ecosystem is interesting, to say the least. Like a mix between Cisco, Google and Apple; Behind the modern locked-down web UIs hides a modified version of Alpine Linux.
If, like me, you use a UniFi controller running UniFi OS 3, the TLS certificate and key for all UniFi dashboards are located in /data/unifi-core/config/ as unifi-core.crt and unifi-core.key.
So, to get a valid certificate, you must run an ACME client (like dehydrated) off device and then SFTP the result to the aforementioned path. SSH/SFTP can be enabled on the UniFi Controller’s Settings page under Console Controls.
However, if you want a more automated approach, I recommend you try out ubios-cert.
Posted on by Carlgo11